Reducing Risk Ahead of Sell Walls
Exiting positions before sell walls and managing risk.
Sell walls as price ceilings
Sell walls are concentrated liquidity above the current price. On DEXs, they represent real capital committed to sell at those levels -- harder to fake or pull than CEX order book walls.
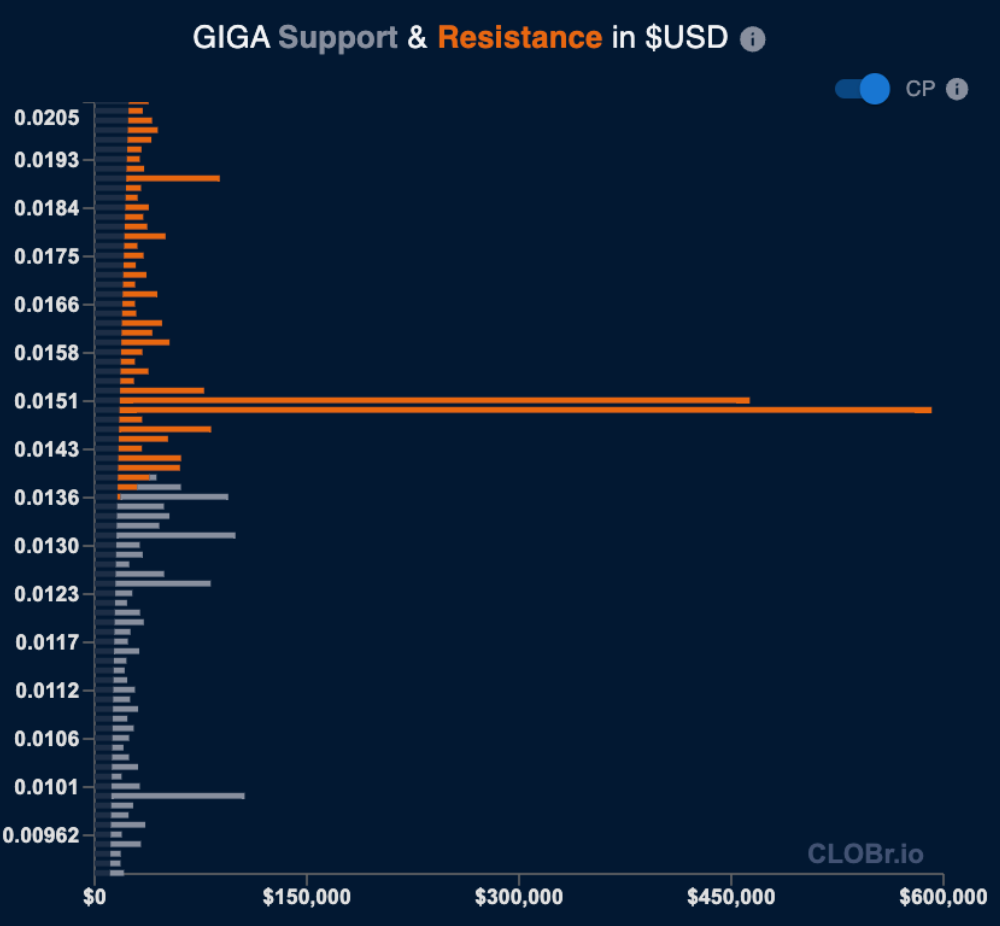
A big sell wall coming up for GIGA
Why they matter if you're long
When you're in a long position and price is heading into a sell wall, you have a decision to make. These walls:
- Slow or completely stop upward momentum
- Act as price ceilings that need serious buying pressure to break
- Show where big players are willing to sell -- possible distribution
- Often trigger reversals or chop once price reaches them
- Give you concrete levels to plan exits around
Which sell walls actually matter
Not all sell walls are equal. Here's what separates a speed bump from a real barrier:
What makes a sell wall serious
- Size: Walls representing at least 5-10x of an asset's constant product liquidity resistance at that level
- Composition: High stablecoin percentage means real selling intent, not just LP positioning
- Persistence: Walls that have been there for days or weeks, not hours
- History: Price has rejected at this level before
- Clustering: Multiple smaller walls concentrated around the same price area
- Platform: Walls on DEXs are more reliable than those on CEXs
How to play it
When price approaches a big sell wall, the move is simple: sell just below it. Use a limit order, a DLMM position, or a swap. Exit before the wall gets tested -- these levels often trigger reversals or chop.
- Sell Just Below the Wall: Place your sell order (limit, DLMM, or swap) within 1-2% below the major sell wall identified in CLOBr. This allows you to exit before the wall is tested and potential resistance is encountered.
- Re-Enter on Bounce: If price bounces off the wall and returns to lower levels, consider re-entering your position if you remain bullish on the token. You can repeat the process, selling again just below the wall if price approaches it once more.
- Re-Buy on Wall Break: If the wall is broken or removed, there is no longer significant resistance at that level. If you are still bullish, this can be a signal to re-buy or add to your position, as price may continue higher with normal buying pressure.
This approach keeps your strategy simple and repeatable: sell just below resistance, re-enter if the wall holds and price returns lower, and re-buy if the wall is broken and you remain bullish. Avoid overcomplicating with graduated exits or distance-based scaling—focus on the key liquidity level itself.
Assessing wall quality
Not all sell walls deserve the same respect. Use CLOBr's pair exposure to figure out what you're dealing with:
Strong Walls (Higher Risk)
- High stablecoin percentage (70%+)
- Multiple liquidity sources contributing
- Persistent over time (days or weeks)
- Located at psychologically significant levels
- Historical resistance confirmed by previous price action
Approach: More aggressive profit-taking, tighter stops
Weaker Walls (Lower Risk)
- Low stablecoin percentage (under 30%)
- Single liquidity source
- Recently formed
- Primarily composed of LP positions
- Located at random price levels without historical significance
Approach: More moderate profit-taking, looser stops
Example: Managing risk in BONK
Here's how this looks with an actual BONK trade:
Scenario
- Current BONK price: $0.000029
- Major sell wall identified at $0.000035 (about 20% above current price)
- Wall composition: 70% USDC, 30% SOL (strong selling intent)
- Wall size: $2.5 million (significant for this level)
- Historical context: Previous price rejection at $0.000034-$0.000036
Risk Management Plan:
- Sell Just Below the Wall: As price approaches $0.000035, place a limit sell order, DLMM position, or swap to exit your position within 1-2% below the wall (e.g., $0.0000345). This allows you to exit before the wall is tested.
- Re-Enter on Bounce: If price bounces off the wall and returns to lower levels (e.g., back to $0.000032), consider re-entering your position if you remain bullish. If price approaches the wall again, repeat the process and sell just below the wall.
- Re-Buy on Wall Break: If the $0.000035 wall is broken or removed, treat this as a re-buy signal if you are still bullish, as there is no longer significant resistance and price may continue higher.
Quick rules
- Stablecoin-heavy walls are real barriers. Respect them more.
- Scale out rather than going all-or-nothing.
- Walls change. Keep checking CLOBr -- a wall that was there yesterday might be gone today.
- Use TA alongside liquidity data for confirmation.
- Set your exit plan before price gets close. Emotion kills discipline.